
Table of Contents
Interact with Cloud Storage (Desktop)
Feature present since ADCI version 1.13.
Cloud Storage Overview
Amazon Simple Storage Service (S3) is a secure cloud storage service provided by Amazon Web Services (AWS). S3 is utilized to store user-specific files which must persist from one ADCI_Online streaming session to the next. Uploaded metaphase images and reports generated by ADCI are stored in S3 and are not visible to other users. While streaming ADCI, your user-specific S3 folder is mounted to the streaming hardware, allowing you to access your files. Separately, our Data Storage and Retrieval Desktop Application provides an interface to the your user-specific folder in S3, allowing samples to be uploaded to cloud storage, listed, or removed. The Data Storage App also provides a mechanism to transfer other ADCI-related files between cloud storage and your local system.
Launch Application
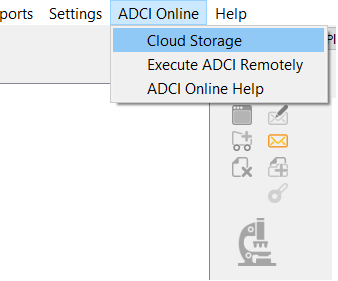
- Within the ADCI main GUI, select “ADCI Online” in the upper menu bar and click “Cloud Storage”.
- On launch, the Data Storage and Retrieval application will automatically attempt to connect to your user-specific folder in cloud storage using credentials bundled with your ADCI installation. The application is ready to transfer files if the text “Successfully connected to cloud storage” appears in the console area (see the attached screenshot in the “Application Overview” section below).
Application Overview
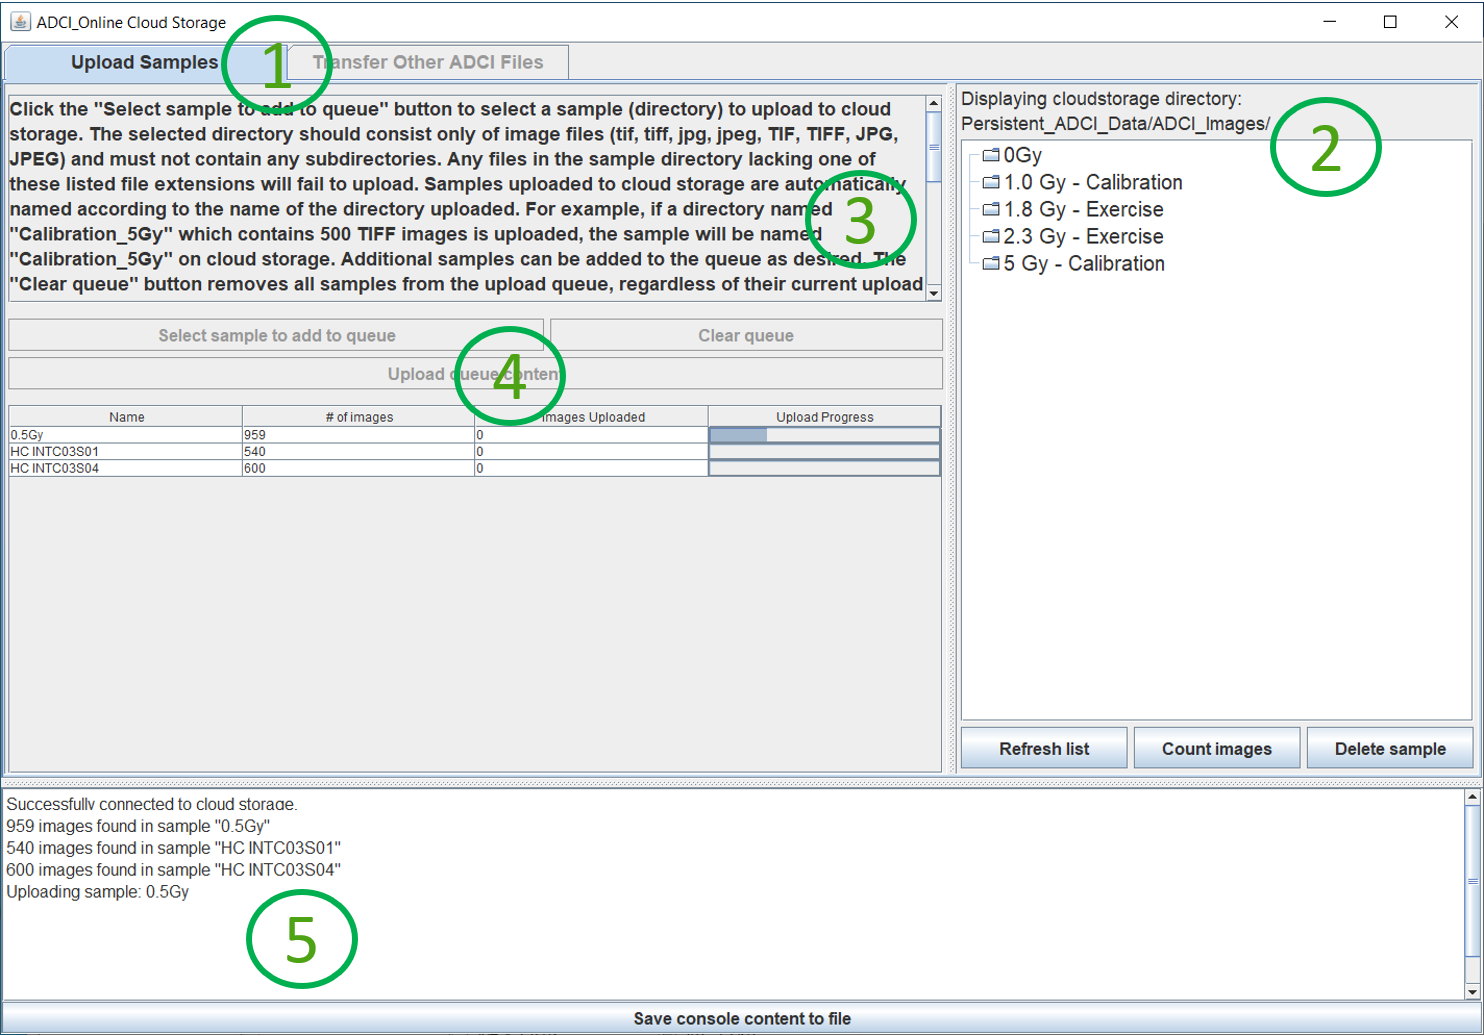
- (1) Function Selection
The two broad functions of this application are to upload samples to cloud storage (“Upload Samples” tab) and to facilitate the transfer of other ADCI-related files to and from cloud storage (“Transfer Other ADCI Files” tab). Upon selection of a desired tab, sections 2-4 will update. - (2) Remote Storage Display
When the “Upload Samples” tab is selected, this area will display samples currently present in cloud storage. When the “Transfer Other ADCI Files” tab is selected, you may traverse all directories in your user-specific portion of cloud storage. - (3) Documentation
Text describing the selected function appears here. Note it may be necessary to use the scroll bar to view the full text. - (4) Transfer Queue
A tabular display of samples or other files to be transferred appears here. Transfers occur in the order they appear in this queue. - (5) Console
Text output by the application appears here. This text may include additional information about the action currently taking place, error messages, and more. All console content can be output to a text file if desired.
Upload Samples
Prepare Local Files for Upload
First, we must ensure all samples to be uploaded are present on your local system and that metaphase images associated with each sample are stored in separate directories. For example, if you would like to upload two samples (Sample1 and Sample2) to ADCI_Online to be processed, all metaphase images associated with Sample1 must be present in a single directory named 'Sample1'. The same is true for Sample2. The Sample1 and Sample2 directories should contain only metaphase images associated with the particular sample and no other files or directories. An appropriate directory structure on your local system before upload can be seen below:
Note: When a directory containing metaphase images is uploaded to S3, the name of the directory on your local system is used as the name of the directory (sample) on S3. If desired, you may wish to change the name of the directories containing metaphase images before upload.
PathOnYour/
└── LocalSystem/
    ├── Sample1/
    │   ├── img1.TIFF
    │   ├── img2.TIFF
    │   └── ... more metaphase images
    └── Sample2/
        ├── img1.TIFF
        ├── img2.TIFF
        └── ... more metaphase images
Select Sample and Perform Upload
- Ensure the “Upload Samples” tab is selected (see the Application Overview section above for more information).
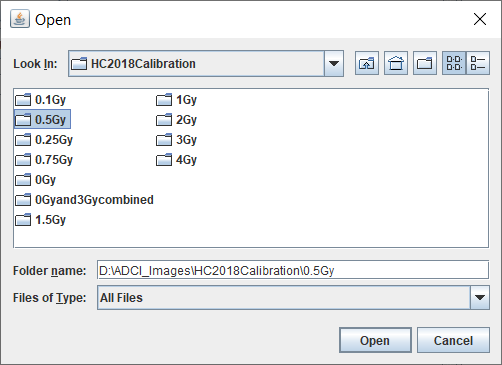
- Click the “Select sample to add to queue” button to browse your local system for a sample to upload (browse dialog screenshot shown to the right).
- Select the folder containing metaphase images to upload and click “Open”. For additional information on how this directory should be structured and the types of files it should contain, consult the “Prepare Local Files for Upload” section above.
- The name of the selected sample and number of associated image files should now appear in the transfer queue below. A screenshot of an example transfer queue populated with three samples is shown to the right.
- Additional samples can be added to the transfer queue by repeating the steps above. While browsing your local system for samples, it is possible to select multiple samples simultaneously by holding the ctrl button while clicking directory names.
- Once the transfer queue is populated with all samples you wish to upload to cloud storage, click the “Perform transfers in queue” to initiate the upload process.
- In the order samples are listed in the sample queue, samples will begin to upload. A grey bar under the table header “Upload Progress” indicates the upload progress of each sample. While samples are uploading, other actions in the Data Storage and Retrieval application are disabled.
- After a sample has been uploaded, the time elapsed (in seconds) is displayed in the console area.
- When all transfers in the queue have completed, the remote display area is automatically refreshed. Your newly uploaded samples should now be visible.
- Please confirm the content of table columns “# of images” and “Images Uploaded” match for each uploaded sample. The column “# of images” is populated by counting the number of image files in the sample directory in your local system, while “Images Uploaded” displays the number of images successfully uploaded to cloud storage.

Sample Upload Troubleshooting
In the event images failed to upload during the sample upload process, we must collect more information to determine next steps. First, observe the content of the progress bar, the 'Succeeded' field, and the 'Failed' field. Next, when an image fails to upload, its file name and the reason the upload failed is displayed in the console area.
- File Extensions
One reason a file can fail to upload is its file extension. All files must be image files with one of the following file extensions [tif, tiff, jpg, jpeg, TIF, TIFF, JPG, JPEG]. We can confirm if this is the issue by examining the content of the console area. Observe the upload failure message for one of the files which failed to upload. If the file name listed does not have one of the extensions listed above (the listed reason for the failure will read 'Reason: AccessDenied: Access Denied'), it is highly likely that an unexpected file extension is the reason for the failure. - The Majority of Files Uploaded Successfully
If the majority of images were successfully uploaded but several failures were present, we must determine if the images failed to upload are genuine image files associated with the sample. Consult the console area to view the file names of the files which failed to upload.- If they are not image files, please note the system does not permit files to be uploaded other than the set of image file extensions listed above. In this case, so long as all genuine image files in the sample uploaded successfully, the upload has completed successfully.
- If they are image files with a proper extension (as listed above), then the files may have failed to upload due to an intermittent connection problem or an issue with cloud storage. In this case, please wait several minutes and perform the sample upload again. If the problem persists, please contact CytoGnomix for assistance.
View or Delete Samples in Storage
Once samples have been uploaded to cloud storage, the Data Storage and Retrieval application can obtain a count of images in the uploaded sample, or delete the sample. Along with the number of images successfully uploaded which is displayed in the transfer queue while uploading a sample, obtaining an image count here is another method to confirm all images in your sample were uploaded successfully.
- Ensure the “Upload Samples” tab is selected (see the Application Overview section above for more information).
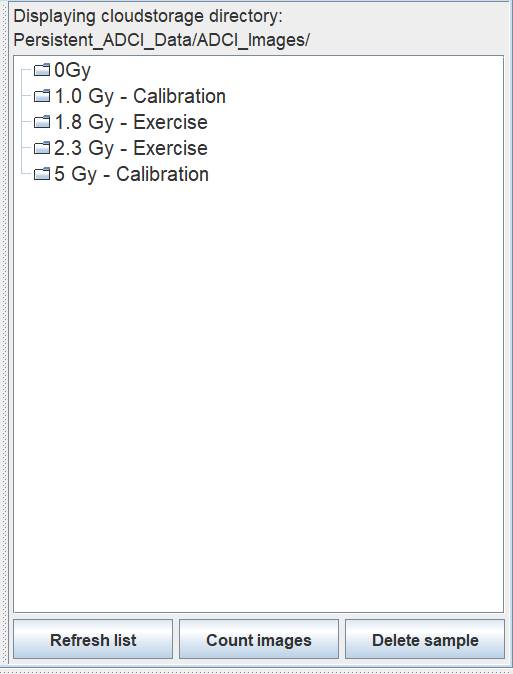
- Samples currently in cloud storage are displayed on the right side of the screen.
- Click the 'Refresh list' button (located below the sample list) to ensure the list is up to date.
- Click to select a sample you wish to interact with in the list.
To obtain the number of image files in a selected sample
- Click the “Count images” button while a sample is selected.
- A dialog box will appear with the text “Image count: ”. When the system has determined the number of images associated with that sample in cloud storage, the image count will be populated.
To remove a selected sample from cloud storage
- Click the “Delete sample” button while a sample is selected.
- A dialog box will appear prompting you to confirm you want to delete the sample (the sample name and image count is listed here). Click “Yes” to proceed with sample deletion or “Cancel” to exit without making any changes.
- Click the 'Delete sample' button to confirm the deletion, or click the 'Cancel' button to perform no action.
- If you choose to proceed with the deletion, a new 'Delete Sample' dialog box will appear containing the name of the sample, the deletion “State”, and the number of images successfully deleted. When first initiated, the deletion state will read “DELETION_IN_PROGRESS” and will change to “COMPLETE” when all images have been deleted. The list of samples in cloud storage will now automatically refresh.
- Rarely, some images may not be deleted successfully. If the number of images successfully deleted does not match the total number of images in the sample, simply delete the sample from cloud storage again (by repeating the above steps).
- Click the 'Refresh table' button to confirm the sample has been deleted. The deleted sample should no longer appear in the list of samples.
Transfer Other File Types
Overview Several other file types related to ADCI can be transferred between cloud storage and your local system. These file types are:
- processed samples (“.adcisample”)
- image selection models (“.adciimageselection”)
- all ADCI report types:
- provider report (dose estimation - csv format)
These file types are automatically directed to an appropriate destination directory within the target system's 'ADCI Data Folder' (described on the ADCI installation wiki page) when transferred. Processed samples are directly placed in the 'ADCI Data Folder' directory on the target system. Image selection models and reports are directed to subfolders “SelectionModels” and “Reports” within the 'ADCI Data Folder', respectively.
The free transfer of processed sample and image selection model files facilitates straightforward sharing of image processing results locally and on the cloud. For example, there is no need to use cloud resources to process metaphase images associated with calibration samples that were processed locally in the past. Processed sample files can be uploaded to cloud storage alongside one or more associated image selection models to perform dose estimation of test samples processed on the cloud system. It may also be useful to download samples processed on the cloud system to perform dose estimation locally or for record-keeping purposes.
Add Local Content to Transfer Queue (upload files)
- Ensure the “Transfer Other ADCI Files” tab is selected (see the Application Overview section above for more information).
- Click the “Add local files to queue” button to browse your local system for content to upload.
- Select a file (or folder if uploading a report) to upload and click “Open”. Note only files with file extensions “.adcisample” or “.adciimageselection” are visible while browsing.
- Additional content can be added to the transfer queue by repeating the steps above. While browsing your local system for files, it is possible to select multiple files simultaneously by holding the ctrl button while clicking file names.
Add Remote Content to Transfer Queue (download files)
- Ensure the “Transfer Other ADCI Files” tab is selected (see the Application Overview section above for more information).
- Content currently in cloud storage is displayed on the right side of the screen.
- Click the 'Refresh' button (located below the cloud storage display) to ensure the list is up to date.
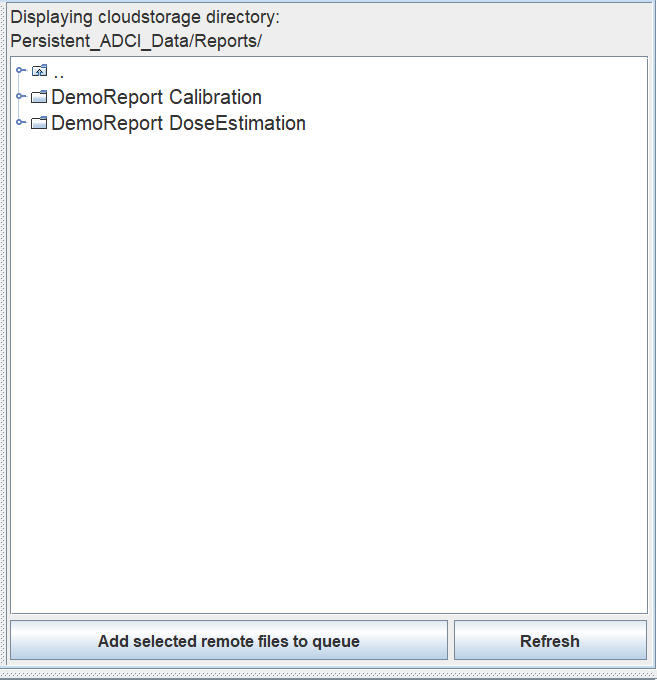
- Double click a directory to populate the cloud storage display with its content. Double click the list entry labelled “..” to return to the parent directory. This “..” entry will always appear at the top of the directory list so long as the parent directory is accessible. Note the current directory being displayed is written directly above the list of files on cloud storage and is labelled “Displaying cloudstorage directory:”.
- Click on a file or report directory to highlight it, then click “Add selected remote files to queue” to add the highlighted items to the transfer queue.
Perform Transfers in Queue

- Once the transfer queue is populated with content you wish to transfer, click the “Perform transfers in queue” to initiate the upload process. Note this queue can simultaneously contain content to be uploaded and downloaded.
- In the order content appears in the transfer queue, content will begin to transfer. While transfers are occurring, other actions in the Data Storage and Retrieval application are disabled. The “Transfer Status” field indicates the state of each entry in the queue and is populated with one of the following values:
- “NOT SUBMITTED” - the content has been added to the queue but the transfer has not yet been initiated
- “QUEUED” - the transfer process has been initiated, but other queue entries precede this content and must complete before this transfer can begin
- “IN PROGRESS” - the content is currently uploading/downloading
- “TRANSFERRED” - the content was transferred successfully
- “ERROR - See console” - if the content could not be transferred successfully, an error message will appear in the console.
- When all transfers in the queue have completed, the remote display area is automatically refreshed.
- Please confirm the “Transfer Status” for all content in the queue reads “TRANSFERRED”. If an error was encountered, see the console area for additional information.
Other File Transfer Troubleshooting
- Content cannot be downloaded to the local system if a file/directory with the same name already exists in the destination directory. An error message will appear in the console which displays the target location for the download. An example error message is: 'Error transferring “MyReport”. The local file/dir “D:\ADCI_Data\Reports\MyReport” already exists. Download cannot continue'. To fix this issue, the preexisting local file can be renamed or moved to another location.
- Files to be uploaded to cloud storage (other than metaphase images) must be processed samples (“.adcisample”) or image selection models (“.adciimageselection”). ADCI reports can be downloaded to your local system, but cannot be uploaded to cloud storage.